Weatherized chimney in all it's glory. It is detachable at the seam above the boot. Had our first fire 2 days ago and it worked beautifully! Bought fire extinguishers. =)
Here's the shut offs for our propane lines - fridge and stove. We hid them underneath the sink so that we have easy access.
Here's the flex hose we're using to connect the propane to the stove. We'll use another one for the fridge. It's plastic coated steel.
J replaced the gaskets on our stove. Nice. Good seal.
Co-pilot chair - so we can both ride shotgun! Ripped it out of a van at pick n pull. Smells a little - will need to be annointed with some kind of essential oil? Cleaned it up and sawed off it's arm rests so it can snuggle up against the driver's seat. I'm going to make a nice fabric cover so that they'll match.
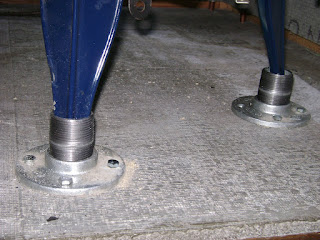
Here's a partial solution for our woodstove security project - plumber's flanges. This keeps it from sliding but not from jumping up and over. We find jumping hard to imagine but we're going to bolt down some u-bolts so that we can ratchet a tie down over it on the road just in case. In the pic it looks a bit like the legs aren't seated on the ground - they are. The flanges are just surrounding them tightly.
Ripped out two windows yesterday! They come out so easy. Sheet metal (aluminum?) from Shnitzer steel.
Top vent is for the range hood fan, bottom vent is for the pilot of the oven. The duct tape is temporary, folks. =) We are going to paint the sheet metal white to match the rest of the bus.
I ripped this ugly 12 volt fan out of the old ugly range hood that came with our stove when we scored it free. The hood is too big for our space so I salvaged what was useful in it. Haven't hooked the fan up yet so I don't know if it works. If it does (I think it does), we're planning on bending a sheet of pretty, decorative metal grill over the front of it. Difficult to explain effectively but it will look cute, godammit. The sheet metal covering the windows still needs to be caulked and insulated. We're going to use that foil/bubble wrap stuff in several layers and then cover the whole thing over with wood. Still need to fabricate some kind of heat-guard for the back of the stove.
Blocking out those 2 windows has really changed the space in an exciting way. For some reason I was getting an Austrailian vacation feeling in the bus now. I've never been to australia but it seems like a good theme to roll with for now. =)
You might have already been able to tell from the pics: it finally stopped raining for a minute! YAY!
Tuesday, February 12, 2008
Odds and Ends
Posted by Erin Gilday at 8:36 AM
Subscribe to:
Post Comments (Atom)


7 Comments:
wow, you are moving right along! I am most excited to see the co-pilot seat =) I have been fretting about this. . . I mean, who wants to sit in the back, lol. And congrats on the first fire ;)
Awesome work girls!
Tell me, have you looked into insurance yet? That is an interesting journey.
hey ladies!
thanks for the good feedback! =) yes...having 2 seats in the front makes a TON of sense. I think the reason why lots of the time you only see one seat in the front is because there's only one person building it - usually a dude - and he's already planning on sitting shotgun, wifey (etc.) be damned! lol...
And Lizz, we do have insurance and registration! We worried so much about it before we did it. It was an exciting step that we forgot to post about so I'll explain here: We got insurance through Progressive with an agent named Bill Tanner here in Eugene. He came recommended by one of our housebus friends. We pay about $600/yr for full coverage. Told him it's a non professional RV conversion. He only had one question: how does it look? I said that it "looks good"....no other details needed. =)
Registration was easy too. (Expensive though! $400 for 2 years registration, new plates, new title and a $50 fee for registering it more than 30 days after we bought it...uhg) I just brought our insurance papers in to the DMV made sure that the part saying "RV Insurance" was visible to the clerk from the get go. I said: "I'd like to register my motorhome." The guy looked a little confused because it's registered as a bus and says "bus" on the old title but he didn't really make much of it. This, after we called every DMV in the state and disclosed everything: it used to be a bus, I'm making it into an RV, no i'm not a professional, no it's not done yet, etc. Every DMV person said that I would not be able to register it as a motorhome and that I would need a Class C license to drive it.
Once I realised the less information you give, the better people's responses get, everything turned around. It's nobody's business what the heck it is/was/is going to be. As long as you don't give them reason to give you trouble (I dressed real nice!) everything is gravy. Do not say the words SCHOOL BUS under any circumstances!!! Stick with words like "truck" and "motorhome." I think it would have been a bit harder if our bus had actually been a public school bus in a past life. It was an army bus and then it was a private school bus so I think that made things a bit easier. The DMV is freaky about public school buses.
Good luck!
Erin
Erin~
You rock! That is exactly the kind of info I was looking for. I will be giving your agent a call.
Thanks!!
Nice work Ladies. Are you going to ratchet your stove everytime you drive? Is it possible to weld the bottom of your stove legs to the devices you have on the floor? Ratcheting things down is a pain everytime you drive. Our first conversion used a number of ratchets. They're cheap though, which is nice. :-)
-Richard in Rossland
Glad to be of help, Lizz! =)
And hey Richard! Thanks for your comment! Yes, for now we are planning on ratcheting it down every time we drive. Unfortunately, I don't know how to weld nor do I have the tools for it. If i was so equipped, that would be my hands-down first-choice solution for lots of problems. =)
The thing about the wood stove is that the legs don't have any feet on them - they just kinda taper off into a tiny little v-shaped hoof that you can't really grab onto with any kind of fastener...I was initially thinking of drilling through it at a 45 degree angle and then bolting it down but once I started trying to gauge what size bolt would fit onto it I realized that I would have to use a tiny little bolt...and that kind of defeats the whole purpose. =( I also heard that drilling cast iron is tough...like several diamond bits and lots of cutting oil tough. Sounded expensive. Also heard that cast iron can be brittle when drilled and might crack or break. Ack!
Ahhh, this is where tie downs come in. We had to resist the urge to use them in more places...they are so useful and easy and fast. Unfortunately, they look a little rickety and we are trying to make our bus look semi-legit. But a few tie downs here and there? Hey at least it's better than duct tape. =)
Richard, it would be a treat to see pics of your conversions, BTW! Are you living in your latest one full time?
Best, Erin
Why not drill through your flange and stove leg? A 1/4 inch diam bolt or so would be plenty... Harbor Freight has a tapered bit that goes through cast like it was butter for about 5 bucks on sale...
Post a Comment