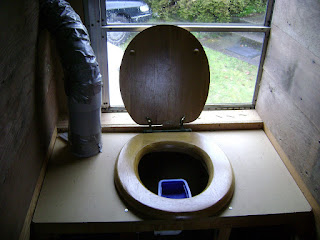
(Mostly) Finished composting toilet!
Our vent is a total duct tape explosion. We made it out of an old dryer vent we had lying around. I wrapped it in duct tape because the exposed metal of the hole in the ceiling scraped away some of its plastic sheath and I didn't want to worry about holes in our ducting. It connects to the 12v nearly silent fan we bought for too much money from Sunmar. Switch on the wall to the right. The cabinet doors we got at Bring and the hardware we got at an estate sale earlier today! Still not sure how we're going to finish the top of the composting box - paint? Collage? Tile? Leave as is? Not sure. We are going to give everything in the bathroom a good coat of tung oil for water resistance and easy clean-ability.
Julia cutting a really nice hole for the vent with our new Jigsaw! So much easier than trying to do this with a sawzall...
Here's the vent snaking out of the bathroom and up out the roof. This comes out over our icebox, which is where we're going to build our pantry. The vent will live at the back of the pantry where you can't really see it. I used a little bit of pipe insulation to protect the vent from the exposed metal of the opening. Duct tape strap is temporary. =)
Here's me installing the vent collar... and trying to race the sunset.
There's the vent peeking out the roof. We found the cap at Bring and the collar at the Rebuilding Store in Portland. I think it looks cute! Kind of like the little cousin of our chimney. I'm pretty sure the cap was originally intended to be used for a gas stove but I think it'll work for our purposes.
Here's the inside of the compositing chamber. We are going to have three bins of that size. Each bin sits on top of a tray. The bottom of the bins are perforated and each bin has 2 perforated plastic tubes resting inside of them (and eventually inside of the compositing mass) in order to increase airflow from within. Before you begin to use a bucket, you line the bottom with a good amount of composting mulch and then after each use, you pour enough mulch on top to cover everything over. By the time the all the buckets are full the oldest bucket should be earth. We bought some mulch from Biolet for our first go-round but we plan on making our own mix in the future. #1 is diverted to gray water tank. We had a bunch of heater hose lying around from when we removed the coolant-driven heater original to our bus so we recycled it. You can see it here in our pee diversion system. =) Thanks to Sean for allowing us to borrow his design!
Here's what it looks like with the bathroom filled in! It has really changed the space for us in a positive way. We're going to wait until we build the pantry above the ice box to finish the rest of the exposed wall. Please excuse the mud we've tracked into the bus - it' s been raining a lot lately. =)
Here's the beautiful paneling we used to cover the exposed wall that stretches along most of the right-hand side of our bus.
Here's the cabinet we built to cover the electrical bay. You can barely see it in the pic but we used a nice bar latch to lock the doors together.
The outside of the bathroom/hallway to bedroom. You can't see it in this pic but we used this neat folding door for the bathroom. I think it was made for a closet but it works really well for our purposes. We put handles on both sides with a lock on the inside of the door for privacy. It feels great to have our bed in the bus!
Friday, March 14, 2008
Composting toilet and more walls
Posted by Erin Gilday at 4:34 PM
Subscribe to:
Post Comments (Atom)


8 Comments:
Oh how exciting!
Love the duct tape, really, it has to be done at some point, even if temporary. Great toilet set-up. The bedroom feels like one now. The panelling is nice, I think you may have captured an orb in one picture.
It's cozy and feeling/looking so sweet. I bet you girls just can't wait!
Bless~
wow, this is really coming together! Looking more and more like a home :) I am seriously intrigued by your composting toilet! I have only seen the factory made composting toilets.... Have you camped out in the bus yet?
Hey ladies! =)
I saw the orb too! I think it's light reflecting off of one of the nailheads in the paneling...never felt like we had anyone with us in the bus. (thank god! i would have freaked out if we had a haunted bus!)
we haven't camped out yet. we plan on it soon though. still need to make more curtains to feel cozy. we're visiting family in CA at the moment so when we get back into town we're going to get new tires for her...that'll be a major step in a good direction.
first trip coming soon - springtime eastern oregon!
hi ladies!! I'm so happy to have found your blog!! your house bus looks awesome. looks like a lot of hard (but fun!) work! See you gals at the market :-)
*Blessings*
Marlena
Wonderful job you two are doing. Your love for each other and for life is showing...
Having spent much of my life on the road, I have to say that it is where I became educated beyond what any school could do. On the road to find out.
Now we're homesteading...in a house of our own design and construction...mostly with native materials...when we travel, it is often just a walk to the pond, or to the studio which is 1/4 mile from the house...we've been here going on 24 years.
Best to you both...we'll check back and see more of your beautiful work.
Post a Comment